Difference between revisions of "Turbidity meter"
From (art)scienceblr
(Created page with "Making turbidity meter with Tasneem .") |
|||
| Line 1: | Line 1: | ||
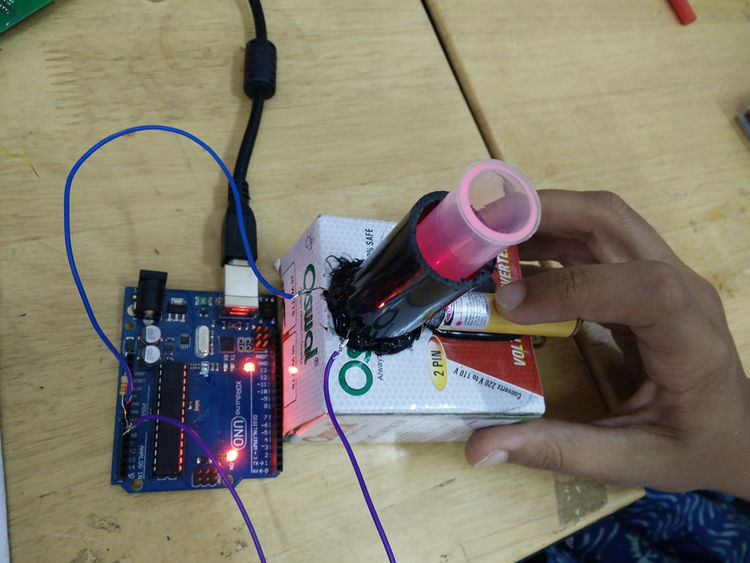
| − | + | With Tasneem we made a simple turbidity meter using an LDR and laser. | |
| + | |||
| + | [[File:Turbidity 1.jpg|750px]] | ||
| + | |||
| + | Materials needed - | ||
| + | |||
| + | 1. LDR | ||
| + | 2. Laser Pointer | ||
| + | 3. 33k Resistor | ||
| + | 3. Dark tube/Box (We used a black pvc pipe) | ||
| + | 4. Arduino + usb cable | ||
| + | 5. Wires | ||
| + | 6. test tubes | ||
| + | |||
| + | Tools - | ||
| + | 1. Soldering Iron + Solder | ||
| + | 2. Glue Gun | ||
| + | 3. wire cutter/stripper | ||
| + | |||
| + | |||
| + | 1. Connect one leg of the LDR ground on the arduino . The other leg of the LDR will go to analog input 0 (Any of the analog inputs can be used. | ||
| + | 2. Connect one leg of the resistor to +5V on the arduino. The other leg of the resistor will go to the same analog input as the LDR (A0 in this case). This forms a [https://en.wikipedia.org/wiki/Voltage_divider| potential divider.] | ||
Revision as of 17:14, 30 March 2016
With Tasneem we made a simple turbidity meter using an LDR and laser.
Materials needed -
1. LDR 2. Laser Pointer 3. 33k Resistor 3. Dark tube/Box (We used a black pvc pipe) 4. Arduino + usb cable 5. Wires 6. test tubes
Tools - 1. Soldering Iron + Solder 2. Glue Gun 3. wire cutter/stripper
1. Connect one leg of the LDR ground on the arduino . The other leg of the LDR will go to analog input 0 (Any of the analog inputs can be used.
2. Connect one leg of the resistor to +5V on the arduino. The other leg of the resistor will go to the same analog input as the LDR (A0 in this case). This forms a potential divider.
